
Now you see it...
Normal Mapping is a versatile technique used to improve lighting and have objects appear more detailed than they actually are. Games have taken this technique mainstream and apply normal maps to low-polygon models to make their models look more realistic. The idea behind normal mapping is to maintain a model's quality without sacrificing your framerate in order to render a high-polygon model. This blog is going to cover what Normal Maps are, how they're used and how games nowadays employ them. Information from this blog can be traced back to Naughty Dog's GDC08 Talk about Normal Maps in the industry which can be found here.
What is it?
Even though Normal Mapping is sometimes referred to as Bump Mapping, it is important to note that while Bump Mapping preturbs the existing normal of a model, normal mapping replaces the normal entirely. Each colour channel of the normal map represents an 8-bit bending of the pixel normal on an axis (one axis for each channel - R G B). Overall, it is a relatively inexpensive manner of representing highly detailed surfaces and allows for lighter meshes which make the model easier to weight and rig in Maya. This means that the models will be faster to animate and all computations are typically moved from the CPU to the GPU. On the other hand, normal maps don't necessarily do anything for silhouettes and are only good for high and mid frequency detail. There is always the possibility of artifacts such as inefficient asymmetry between the geometry and texture. Of course, for anything to work efficiently, it takes time and normal mapping is no exception to the rule.

What do the colours mean?
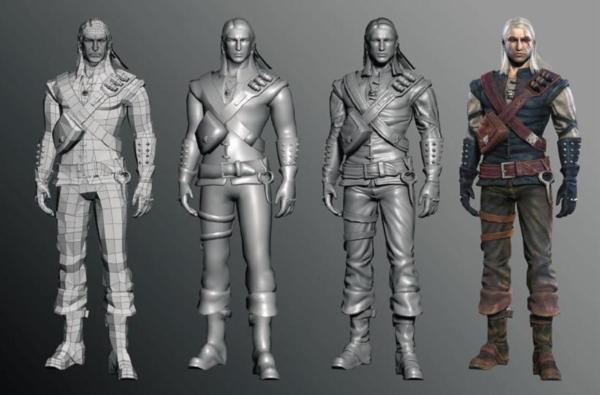
When designing a model or sculpting in a program such as Zbrush, it is important to begin thinking about light even before anything has been sculpted. An organized approach will lead to analyzing the form of your sculpture before beginning any kind of work on it. Breaking the model down into its most basic geometric shapes before finely carving out the details for the high-poly model render. Light and shadow interacting on the surface of the model creates form you can see this if you imagine extracting these components from a sculpture leaving you with nothing but a silhouette. So it is important to consider lighting angles, reflections and shadows when sculpting.
You could always make normal maps by hand, but you wouldn't want your artist to murder you. So typically a higher-polygon version of a mesh is taken as the extra polygons are used to generate normal maps that are later applied to a low-polygon version. This means that there is often a possibility of hard edges showing up on the final model where corners are, in fact, you can tell how basic the geometry of a model is just by looking at the edges/silhouette of the object. Depending on the size of your normal map and that of your object, you can often get away with this. Any high-poly model you have that conforms around a bend of a low-poly model , you must pay close attention to the smooth groups of those faces to assure correct and precise normal mapping.

A normal map uses the red and green channels of a colour map to distort and transform the surface of a model to suit the artists need. A normal map that is blank will use an RGB colour of 128, 128, 255. The reason the blue channel is maxed out is because blue controls the areas that are flat. The red and green channels are half-way to make them neutral. Conceptualize a scale from -1 to 1 which represent the RGB values. Therefore 50% of any colour gives it a 0 value. This means that anything beyond 128 for the Red and Green values causes a distortion of the surface.
One important thing to remember is that when you create normal maps, render them out at a higher resolution from what the final resolution will be (sometimes even twice as much). This will allow you to add crisper details to the texture. Often when creating normal maps, you may have to render out multiple passes and compile them together (Diffuse, Specular, Normal).

Issues & Optimization
The key to normal mapping is striking the most efficient balance between your geometry and your textures in order to optimize your resources. Any inefficient layouts or model designs will sap your quality. There is a certain "sweet spot" that designers must strive to achieve in order to optimize loading weighted models, static models, poly density, normal maps and everything else by your CPU or GPU. By tuning your are into the performance sweet spot, you will inherently maximize your visuals. Compression is a good idea but improper compression of normal maps will easily lead to strange banding and pixelization on top and lateral angles as well as mushyness. More than anything, these artifacts will take up extra memory which is NOT a good time.
Other common problems include calculations errors revolving around world and object tangent space, mirroring normal maps and dealing with seams. Additionally, it is always possible to run out of memory if normal maps aren't managed efficiently.
In Conclusion
Normal maps are great for adding detail to low poly models. They are admittedly hard work and take time to perfect. Not all games need them and many games look great without them. Still, it is an important concept to learn and is easy enough to implement once understood. With anything, practice is crucial and optimization is the key. You may be able to create normal maps, but if you aren't using them efficiently to maximize performance and hit the "sweet spot" then you're doing it wrong.

No comments:
Post a Comment