Thursday, March 28, 2013

How it's done...


A look at modern day ancient Greece

The God of War series has always been known to push the boundaries of next-gen consoles, whether in terms of graphics, gameplay, or scale. This week we took a look at this gaming titan's method of cascaded shadow mapping in the third installments of this stellar franchise. But I say why don't we discuss the epic achievements of this game even further. Why don't we talk not only about the shadow mapping system but all the other graphical implementations that make this game great. This blog discusses the triumphs of God of War III as well as what makes it different from many other AAA titles that came out at about the same time. Information on this blog can be traced back to Sony Santa Monica's GDC 09 presentation of God of War III. 


Mythology meets art

Art has always been a crucial component in God of War games. Ever since the battle with the Hydra in the beginning of the first game, fans have been in love with the artistic nature of the series. Remaining true to the roots of greek mythology, the artists that have worked on God of War have put in countless man hours to place incredible attention to detail which almost seems to exceed the resolution requirements of the host platform. God of Warr III is no exception and pushed the boundaries with significant detail within both texture and geometry which surpasses that of previous games in the series. The programmable pixel shaders were a big part of the additional quality that gave assets the push they needed to be great. There is of course a cost to all of this, a drop in the framerate - yet, God of War manages the fluctuating framerate well enough to prevent a drop below 30FPS with V-sync engaged throughout the game. 

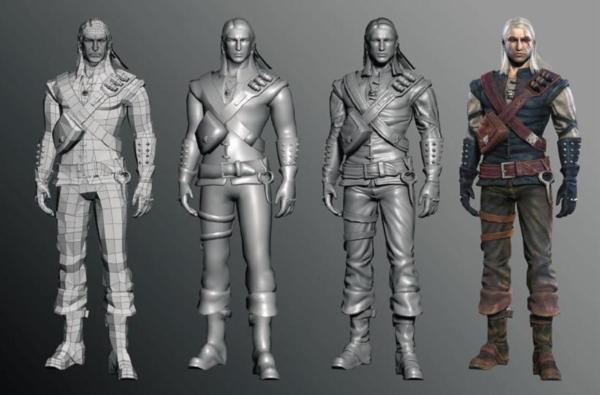
The models are created via low-poly meshes in Maya before being sent to 3D modelers for detailing, rigging and animating. It's interesting to note that the polygon count for Kratos is considerably lower than that of in-game Nathan Drake in Uncharted 2. Ken Feldman, art director on the project says, 

"We use as many polys as it takes. Off the top of my head, texture sized for these characters are quite big. I think we are using 2048s for the lower, upper body and head. Each character gets a normal, diffuse, specular, gloss (power map), ambient occlusion, and skin shader map. We also use layered textures to create more tiling, and use environment maps where needed." 


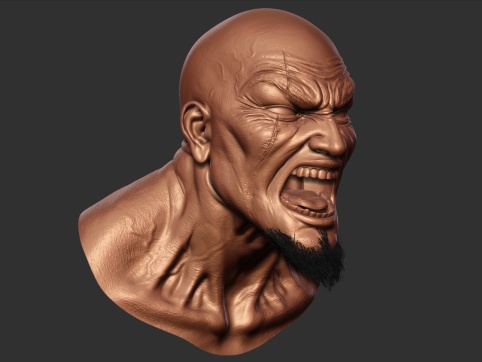
Compared to the PS2 model, Kratos is abour 4 times the polys on the PS3, as well his number of textures from 3 to 20 and the animation data would be six times as big. Blended normal mapping aids the realism of the basic model and enhances the range of animation available. This simply means that Kratos is able to believably unleash his wrath on the Gods through accurate facial and muscle movements. While all main protagonists were animated by hand, secondary characters' facial animation were mapped from those of the voice actors playing the characters. Furthermore, Dynamic Simulation was used to accurately generate more insignificant motions such as the writhing of a serpent's tail or a gorgon's hair. 

With so much impressive art, Sony Santa Monica couldn't help but show it off with their impressive camerawork which was never in the player's control and would often pan around the environment to reveal beautifully detailed landscapes. There is a range of cameras for every scene from dynamic to on-rails and combat cameras which are paired well with dynamic object traversal to create unreal animated sequences and moving platforms such as those portrayed in the beginning of the game. The following battle with Poseidon is a remarkable example of the aforementioned techniques used to make this game unique. 


Memory management

All this dynamic movement brings up the interesting question of RAM management which was an immense challenge in the production of God of War III. Not only are textures and geometry sufficiently detailed at both the micro and macro levels, but there are seamless transitions between the two which are kept in the system memory. Thousands upon thousands of polys in any single scene which change on the fly with dynamic enemy generation and all this needs to be kept in the system's RAM. You can see why this would have never worked on the PlayStation 2.

In place is a data streaming system which runs continuously in the background during gameplay. This allows for no pauses in loading and runs with no mandatory hard disk installation causing everything to be streamed from the Blu-Ray Disk to the system memory in the background. Amazingly, the executable on the Blu-Ray Disk is just 5.3MB in size including all SPU binaries, compared to the total 35GB of space the game disk uses. For the developers like Tim Moss, this is a "point of pride" because it leaves "more memory for content."


Let's talk Graphics

A core component of what makes God of War III look and feel so great comes from the setup of the framebuffer and the implementation of HDR (high-dynamic range) lighting. The game's framebuffer uses their own version of RGBM, a setup which allows for a greater range of lighting across an image while successfully maintaining detail and reducing washout. As such, God of War III allows for a massively expanded colour palette which affords the artists a higher-precision range of colours to create the unique look they feel would best suit the game. Here is another area where God of War triumphs over Uncharted in their implementation of HDR - while the latter decided to go with a LogLUV setup, the former's choice to use RGBM meant a significant saving in processing with a forfeit of some precision. 

As someone who has never been one to think too highly of motion blur, I was quite impressed when God of War III was able to use this post-processing effect in moderation to give the game an additional boost in realism. The motion blur in God of War III effectively manages to smooth some of the judder caused by the varying framerate the game employs. The manner in which Sony calculates motion blur is not just on the camera (as is the case with most games nowadays), but also on an individual object and inner object basis. This allows the motion blur to be subtle and effective in creating a cinematic look. 


The filmic look of God of War III is preserved using new anti-aliasing technology. While the game initially used the RSX chip to carry out traditional 2x multisampling anti-aliasing effect combined with a lack of high-contrast edges, an edge smoothing technique called MLAA (morphological anti-aliasing) was later employed in the game's final release. This nearly eliminates aliasing completely and turns down the sub-pixel jitter associated with the technique significantly. But this is all just one example of how developers are using the Cell CPU as a parallel graphics chip working in tandem with the RSX. 

Developers are attempting to move tasks such as post-processing typically performed by the graphics chip over to the Cell. Though this may be more computationally expensive, you get a higher-quality result at the end of the day. With that said, results can be seen in the render time for any given frame in God of War III. The MLAA algorithm takes a total of 20ms of CPU time running across 5 SPUs which causes the overall latency to be 4ms allowing more GPU time to be used for other tasks. 


All of the lights

One of the most remarkable features of the God of War III engine is dynamic lighting, with up to 50 lights per game object, and that without the use of a deferred lighting scheme. With that said, where there is light there is also shadow and the developers at Sony have strived to make their shadows as realistic as possible because they know that we gamers notice these details. Ben Diamand spent roughly three years gradually developing the deferred shadowing system used in God of War III. His system effectively eliminates artifacts associated with dynamic shadow casting and blends dynamically-generated shadows along with those pre-baked within scenery. Despite the immense accomplishment in new-age shadowing techniques, it is crucial to keep in mind that this is just one cog in the development process of the renderer. 


In Conclusion

Before God of War II was released, work on the third game had already begun with work on shading, rendering, shadowing, optimisations, SPU work, HDR implementation, tone mapping, bloom, the effects framework and tools. It just goes to show the enormity of the task associated with creating the graphical system for a game. There is enough enough refining or optimising involved before a game can be called perfect. What makes God of War III stand out is the immensely talented team that took on a great task and pushed themselves beyond the boundaries to create a game worth adding to any gamer's collection. 

It is important to note that the art is not the only thing that makes the game unique, the combination of highly-detailed characters and environments in combination with the rendering technology is what makes God of War stand out amongst other games in its league. 


Wednesday, March 20, 2013

A focus on engines...


Cog in the wheel

Game Engines are tools used to engineer and develop video games in today's world. They're built is similar to that of a framework and are invaluable in the production process of video games nowadays. This week's blog is going to peruse one of the most popular game engines out there today, the Unreal Engine. I will cover topics such as the development of Gears of War using Unreal Engine 3, what this engine brought to the table and how it does what it does so well. The information from this blog is taken from Michael Capps' presentation on Unreal Engine 3 (which can be found here). 


An Overview

Game Engines have always been fundamental to the creation and development of high quality video game titles. They provide a software framework which developers use to create games for specific consoles (XBox 360, PS3, Wii) and PC's (Personal Computers). Most game engines consist of a renderer for 2D and 3D graphics, a physics engine - this is where collision detection and response takes place, sound, scripting, animation, A.I., networking, streaming, memory management, threading, localization support, and scene graphs. The preceding components compose the core functionality of any game engine which economizes the game development process by allowing developers to reuse or adapt their existing framework in any manner for a plethora of different titles. The idea behind a game engine is also to make it easier for developers to port their games to multiple platforms.


Some engines provide visual development tools in addition to reusable software components. These are present in what is known as an Integrated Development Environment (IDE) to help with the rapid production of games in a data-driven manner. When building game engines, developers keep in mind ways to simplify their lives by developing robust systems which will handle any and all elements of a video game. The idea behind several game engines is to sell the framework at a premium price in order to generate revenue from fans and game makers interested in developing titles similar to the ones released by various popular development teams. 

Software Development Kits are released for this exact purpose and are licensed out to game development teams for a marginal profit. Of course not all the tips and tricks of the trade are released in this from and most companies make use of their engines to produce quality games which entice developers to purchase their Dev Kits. This is a lucrative business proposition as "middleware" does a good job of providing a flexible and reusable software platform with all the core functionality needed to develop game applications right out of the box. This, in turn, reduces costs, complexities and time-to-market which are crucial factors in a the highly competitive gaming industry. 

So let's dig into the meat of the matter.


Unreal

Epic Games was founded by CEO Tim Sweeney and have been made famous with multiple hits in the Unreal and Unreal Tournament series. The Unreal Engine was in development for 10 years and has been licences to external developers since 1997 with more than 50 games making use of Epic's Unreal Engine; from Deus Ex and Rune to Harry Potter and Bioshock. The Unreal Engine has mainly been built for the development of First-Person Shooters. With the release of Unreal Engine 3 came a completely shader-driven rendering pipeline with per-pixel lighting and shadowing everywhere. There were no legacy rendering paths and the engine supported all game types including MMO's and Fighting games. 

It is important to keep in mind that at this stage of the game, consumer expectations are steadily rising with advances in technology and graphical capabilities of most game engines. As such there is a growing need to adhere to industry standards with the release of every next-gen console. Some consumers would even go so far as to base a game's merit strictly on it's beauty as a pose to it's ability to provide an enriching gameplay experience or a captivating storyline.


Rendering Pipeline

As games move to next-gen consoles, there is considerable expense associated with the advancements, as Michael Capps quite aptly points out, you can't simply go from 2,500 to 2 million poly character models or 100,000 to 100 million poly scenes for free. 


Let's talk Rendering Pipeline. All rendering in Unreal Engine 3 is High Dynamic Rendering, all lighting and shadowing options are orthogonal and there is frequent use of deferred rendering techniques. These features come in handy when creating large outdoor or city-like environments such as those in Gears of War or Lost Odyssey. Additionally, high-detail environments are also created with the same techniques. The rendering of any scene consists of three primary stages:

  • A depth set-up pass (Z pre-pass)
  • A pass for all pre-computed lighting
  • A pass per dynamic light

The depth set-up pass uses a fast hardware path with no shading, inherently generating a Z-buffer for all opaque objects. Additionally, per-object hardware occlusion queries are used to cull the later shader rendering which is expensive. The pass for all pre-computed lighting combines direction light maps and emissive materials for each object. The 3-component direction light map texture is applied to the materials normal map. As well, the material may produce light independent of any light sources. The pass per dynamic lighting renders stencil shadows to the stencil buffer and soft shadow-buffer shadows to the alpha-channel. A screen space quad is rendered over the screen extent affected by the shadow. This does not require the re-rendering of objects affected by shadowing. Deferred rendering makes the cost of shadowing dependent on the number of pixels potentially shadowed and not on the number of objects in the scene. 


Shaders & Lighting

The shaders for the Unreal Engine are based on an artist-driven pipeline with complete realtime visual tools. Artists would write shaders by linking Material Expressions. The system was based on a visual node-editing paradigm and would enable artists to visually connect colour, alpha, and coordinate outputs. Programmers could add functionality by coding new Material Expressions in C++ and HLSL. Artists could create extremely complex materials using these programmer-defined components as the code would be generated on the fly. On the other hand, in-game shader code would be compiled statically ahead of time with no dynamic shader compilation in-game and no combinatorial explosion in the shaders. The Material Instance Framework was made for reusable templates with parameters completely scriptable. 

Unreal Engine's lighting and shadowing system was fully orthogonal allowing artists to choose specific lighting/shading techniques per light. This allowed them to customize light/shadow interactions with shadow culling options and lighting channels. All lighting and shadowing was pre-computed and stored in three 3-component DXT1 textures. This techniques is used for its speed and efficiency in supporting any number of lights in one pass. It further preserves normal-mapping detail but deals with diffuse light only. Fo real-time lighting, one rendering pass was run per light/object interaction. This supported dynamic specular highlights and dynamic shadow light functions. 

As far as Unreal's shadowing techniques go, static shadows were pre-computed in the form of soft shadow occlusion into textures. The light could be dynamic but was not allowed to move. To take care of dynamic shadowing, stencil-buffer shadows were used. This supported arbitrary moving lights and were hard-edged. Soft shadowing would happen via 16X oversampling and was used per-object for moving shadows. With that said, the extent of the shadow limited to the light-object frustum, hence, avoiding scalability issues inherent in full-scene shadow buffers. 


Epic Lessons Learned

Through the forty years spent in development of Unreal Engine 3, Epic admitted to several lessons learned during the process which is the only way for them to improve their engine and make it better in time for next generation consoles. One of the primary lessons learnt was that one unified shadowing solution scales poorly to large-scale game development. What you want is many lighting and shadowing options. Of course, you must be prepared to make tradeoffs such as those with static verses dynamic lighting and shadowing as well as soft verses hard shadow edges (stencil verses shadow buffer). Further tradeoffs include scene complexity verses dynamic lighting/shadowing complexity and disbaling shadows when nonessential to visual quality. The development team also realized that it is important to expose lighting/shadowing options orthogonally to allow different tradeoffs to be chosen in a single scene. 

Empowering artists to make these tradeoffs requires great artist tools for measuring and understanding performance as well as a greater emphasis on the "technical artist" role on every project. At the end of the day, Epic surmised that they had to really trust their artists. The realized that they had to make default options (static lighting, pre-computed shadows, etc.) fast in order to force designers to explicitly choose to improve visual quality at the expense of performance. It was important for Epic to make all their rendering features scriptable through in-engine design tools. This was crucial in avoiding spending 30 days building a level in Maya before bringing it in-engine to see how it performed simply to be disappointed with errors and rendering inabilites. 

The most valuable lesson Epic learnt was that next-gen engine development is a hard job. They spent a total of 40 so-called "man-years" for their full-features next-gen engine in order to make it easier for game developers everywhere who may now use Unreal Engine 3 instead of building their own engines. 


To see how other game companies do it, you could always take a look at Jason Mitchell's presentation on Valve's Source Engine at SIGGRAPH 2006 (it can be found here!).


Wednesday, March 13, 2013

Normal Mapping...


Now you see it...

Normal Mapping is a versatile technique used to improve lighting and have objects appear more detailed than they actually are. Games have taken this technique mainstream and apply normal maps to low-polygon models to make their models look more realistic. The idea behind normal mapping is to maintain a model's quality without sacrificing your framerate in order to render a high-polygon model. This blog is going to cover what Normal Maps are, how they're used and how games nowadays employ them. Information from this blog can be traced back to Naughty Dog's GDC08 Talk about Normal Maps in the industry which can be found here


What is it?

Even though Normal Mapping is sometimes referred to as Bump Mapping, it is important to note that while Bump Mapping preturbs the existing normal of a model, normal mapping replaces the normal entirely. Each colour channel of the normal map represents an 8-bit bending of the pixel normal on an axis (one axis for each channel - R G B). Overall, it is a relatively inexpensive manner of representing highly detailed surfaces and allows for lighter meshes which make the model easier to weight and rig in Maya. This means that the models will be faster to animate and all computations are typically moved from the CPU to the GPU. On the other hand, normal maps don't necessarily do anything for silhouettes and are only good for high and mid frequency detail. There is always the possibility of artifacts such as inefficient asymmetry between the geometry and texture. Of course, for anything to work efficiently, it takes time and normal mapping is no exception to the rule. 


What do the colours mean?

When designing a model or sculpting in a program such as Zbrush, it is important to begin thinking about light even before anything has been sculpted. An organized approach will lead to analyzing the form of your sculpture before beginning any kind of work on it. Breaking the model down into its most basic geometric shapes before finely carving out the details for the high-poly model render. Light and shadow interacting on the surface of the model creates form you can see this if you imagine extracting these components from a sculpture leaving you with nothing but a silhouette. So it is important to consider lighting angles, reflections and shadows when sculpting. 

You could always make normal maps by hand, but you wouldn't want your artist to murder you. So typically a higher-polygon version of a mesh is taken as the extra polygons are used to generate normal maps that are later applied to a low-polygon version. This means that there is often a possibility of hard edges showing up on the final model where corners are, in fact, you can tell how basic the geometry of a model is just by looking at the edges/silhouette of the object. Depending on the size of your normal map and that of your object, you can often get away with this. Any high-poly model you have that conforms around a bend of a low-poly model , you must pay close attention to the smooth groups of those faces to assure correct and precise normal mapping. 


A normal map uses the red and green channels of a colour map to distort and transform the surface of a model to suit the artists need. A normal map that is blank will use an RGB colour of 128, 128, 255. The reason the blue channel is maxed out is because blue controls the areas that are flat. The red and green channels are half-way to make them neutral. Conceptualize a scale from -1 to 1 which represent the RGB values. Therefore 50% of any colour gives it a 0 value. This means that anything beyond 128 for the Red and Green values causes a distortion of the surface. 

One important thing to remember is that when you create normal maps, render them out at a higher resolution from what the final resolution will be (sometimes even twice as much). This will allow you to add crisper details to the texture. Often when creating normal maps, you may have to render out multiple passes and compile them together (Diffuse, Specular, Normal). 


Issues & Optimization

The key to normal mapping is striking the most efficient balance between your geometry and your textures in order to optimize your resources. Any inefficient layouts or model designs will sap your quality. There is a certain "sweet spot" that designers must strive to achieve in order to optimize loading weighted models, static models, poly density, normal maps and everything else by your CPU or GPU. By tuning your are into the performance sweet spot, you will inherently maximize your visuals. Compression is a good idea but improper compression of normal maps will easily lead to strange banding and pixelization on top and lateral angles as well as mushyness. More than anything, these artifacts will take up extra memory which is NOT a good time. 

Other common problems include calculations errors revolving around world and object tangent space, mirroring normal maps and dealing with seams. Additionally, it is always possible to run out of memory if normal maps aren't managed efficiently. 


In Conclusion

Normal maps are great for adding detail to low poly models. They are admittedly hard work and take time to perfect. Not all games need them and many games look great without them. Still, it is an important concept to learn and is easy enough to implement once understood. With anything, practice is crucial and optimization is the key. You may be able to create normal maps, but if you aren't using them efficiently to maximize performance and hit the "sweet spot" then you're doing it wrong. 


Wednesday, March 6, 2013

Global Illumination...


Shedding some light

Nowadays games in the current market are strewn with both direct and indirect light in an impressive show of graphics capabilities without much negative consequence to the framerate or graphics driver. Global Illumination, especially Radiosity is one of the most prominent techniques in accomplishing this task using special algorithms to calculate more realistic lighting. This blog is intended to explain the concept of Global Illumination and Radiosity, how they work, where they're used and how they're used. The information in this blog  can be traced back to a Siggraph talk on CryENGINE 3 in 2010 which can be found here as well as a presentation on Global Illumination presented at Gamefest 2008 found here


Let's talk definitions

Global Illumination is an integral part of most next-generation games and game engines, but what is it? Global Illumination is a technique that encompasses several algorithms meant to add realistic lighting to 3D scenes. The algorithms used for this kind of illumination take into account both direct and indirect sources of light. This means they focus on the light coming directly from light sources as well as the light bouncing off surfaces in the scene. Global Illumination includes reflections, refractions and shadows as every object affects the rendering of other objects. This graphical technique causes images to appear more photorealistic with the downside of being more computationally expensive and consequently slower to generate. 

Radiosity is the method of computing the global illumination of a scene and storing the information within the geometry. This will then generate images from different viewpoints without having to go through expensive lighting calculations. Typical radiosity methods only account for paths which leave a light source and are reflected diffusely before hitting the eye. Radiosity calculations are viewpoint independent which increases the computations involved, but makes them useful for all viewpoints. 

The reason Global Illumination has come around as a prominent graphical benchmark is due to the commonly held belief that inherently, it is very important to provide a plausible picture to a gamer in order to deliver a better gaming experience. 


Before and after

Ever since the first 3D games came out, game developers have recycled the formula for lighting up their levels. They begin by making their level's geometry and textures, adding their static lights (sun, lamp lights, flickering bulbs, etc.) and baking which includes all the rays of light projecting out and bouncing around all unchanging objects and world geometry. The specularity of the materials is used to judge the amount of bounces each ray completes before disappearing. This means that the amount of rays populating a given area generally determine how bright it will be. Once these calculations are finally computed, your level is fully lit and ready to go. 

Unfortunately, this method slows down productivity due to the time it takes to adjust a light and then re-bake all your lights onto complex maps. This can take anywhere from a few minutes to a few hours. Keep in mind, however, that the game will still look great though the concept behind it all is clunky and inefficient. 

As a result, games have modernized this technique by performing their calculations in real-time. This allows game developers to quickly change lighting conditions and see the results of their adjustments instantly. The light transfers effects like reflection, refraction, caustics, occlusion and scattering without a drop in the frame rate. Later we will take a look into how CryENGINE 3 manages to do this successfully. 


At the end of the day, Global Illumination adds extra detail and demonstrates a better understanding of 3D shapes and of the distance between objects in the scene being rendered. Various techniques used for creating Global Illumination include ray tracing, path tracing, photon tracing, radiosity (discussed earlier), photon mapping and instant radiosity. This translates to static light maps and shadows, irradiance environment maps, radiosity maps, ambient occlusion (AO), screen-space ambient occlusion (SSAO), real-time radiosity, etc. It is important to keep in mind that Global Illumination is a complex problem. It not only has long iteration times to build content but is also expensive in terms of money, CPU and GPU processing, memory, disk space and streaming. However, the trade-off is that it is non-trivial to implement and could be a differentiating factor for games in the eyes of gamers. Due to this, Global Illumination is already a standard for graphics in next-gen video games. 


CryENGINE 3 

So let's talk about the core idea behind CryENGINE 3's lighting. Imagine the primary light emanating light rays and assume the whole scene consists of only diffuse surfaces. Each ray then excites a secondary emission of bounced radiance along a visible hemisphere of surface element. A regular grid is now introduced to approximate the bounced radiance. All the bounced results inside each cell are accumulated into that cell and we have an initial accumulated indirect radiance distribution. After this the radiance is iteratively propagated around the 3D grid until the light passes the entire grid. This approach uses many lights for approximating reflected lights and use sampled lit surfaces to initialize the 3D grid with the initial lighting distribution. A few bands of SH basis are used to approximate lighting in angular space. This iterative propagation approach lowers down the rendering complexity of many secondary lights. 

This may all seem overwhelming and complex but is only a small portion of the idea behind the larger technique in which point-based global illumination is used within CryENGINE 3. 

The 3.0 version Crytek's engine is a big improvement over version 2.0 in everything from visuals and characters to physics and performance. One of the welcome features is of course Global Illumination as demonstrated below. 


A few words on SSAO

Ambient occlusion is an approximation of the amount by which a point on a surface is occluded by the surrounding geometry. This, therefore, allows the simulation of proximity shadows seen in the corners of rooms and narrow spaces between objects within games. The technique itself is subtle but manages to dramatically improve the visual realism of a computer-generated scene. Let's discuss the basic idea behind this method of making games appear more realistic. 

An occlusion factor is computed for each point on a surface and incorporated into the lighting model by modulating the ambient term to make it so that more occlusion yields less light and vice versa for less occlusion. This computation can be expensive. Offline renderers compute the occlusion factor by casting a large number of rays in a normal-oriented hemisphere to sample occluding geometry around a point. But this is not practical for realtime rendering. So to optimize computation of the occlusion factor, we might want to pre-calculate it. The downfall of this approach is that it limits how dynamic a scene can be since lights may move around but geometry can not. 


Crytek managed to implement a realtime solution sampling the depth buffer at points derived from samples of a sphere. They begin by projecting each sample point into screen space to get the coordinates into the depth buffer. They then sample the depth buffer and if the sample position is behind the sampled depth (inside the geometry), it contributes to the occlusion factor. This makes the quality of the results directly proportional to the number of samples taken. Here's is where we see the trade-off between performance and graphical prowess. 

Reducing the number of samples produces 'banding' artifacts while increasing this number produces a much better looking result with expense to the performance. To settle, a random rotation of the sample kernel at each pixel seems to trade the banding for a high frequency noise which can be blurred to eliminate the artifact. Over the years, of course, this method has been enhanced time and time again. To find out more about implementing SSAO, including real code visit John Chapman's Graphics Blog.


In Conclusion

Ever since good ol' 3D games like Wolfenstein and Duke Nukem, realistic lighting has been a primary goal for game developers. As next generation graphic cards give developers the power to pursue their wildest dreams in realizing real-time lighting computations, there continue to be widely used industry benchmark techniques such as those demonstrated with CryENGINE 3. There is always room for improvement and enhancements are promised with every next-gen consoles. Either graphic designers get more efficient with their algorithms or graphical performance boundaries are pushed by the hardware. The fact of the matter remains that it isn't too long till we see a solid and viable implementation of raycasting and more advanced techniques used for Global Illumination. The new frontier is simply over the horizon.